Internationalization in Java is the process of designing an application that can be adapted to various local languages like Japanese, Chinese and etc to provide output in the same given language. Internationalization is also called as i18n in Java. This is because, between i and n there are 18 characters.
Table of Contents
Why Internationalization Matters
Internationalization (i18n) adapts your app for global audiences by:
- Formatting dates/numbers/currency per region.
- Translating text via resource bundles.
- Sorting text according to language rules.
1. Locale-Specific Formatting
Using the Locale Class
A Locale defines language, region, and cultural preferences (e.g., en_US, fr_CA).
Format Numbers and Dates
Locale german = Locale.GERMANY;

// Number formatting:
double number = 12345.67;
String formattedNum = NumberFormat.getNumberInstance(german).format(number);
// "12.345,67"

// Date formatting:
Date now = new Date();
String dateStr = DateFormat.getDateInstance(DateFormat.LONG, german).format(now);
// "5. Mai 2024"

// Currency formatting:
String currency = NumberFormat.getCurrencyInstance(Locale.US).format(19.99);
// "$19.99"
2. Resource Bundles for Translations
Step 1: Create Property Files
Store translations in .properties files:
messages_en.properties:
greeting=Hello!
button.submit=Submit messages_fr.properties:
greeting=Bonjour !
button.submit=Soumettre
Step 2: Load Bundles Dynamically
Locale locale = new Locale("fr", "FR");
ResourceBundle bundle = ResourceBundle.getBundle("messages", locale);

String greeting = bundle.getString("greeting");  // "Bonjour !"
Fallback Mechanism: If messages_fr.properties is missing, Java falls back to default (e.g., messages_en.properties).
3. Collation and Sorting
Different languages have unique sorting rules. Use Collator for locale-aware sorting:
Locale swedish = new Locale("sv", "SE");
Collator collator = Collator.getInstance(swedish);

List<String> words = Arrays.asList("äpple", "zebra", "åtta");
words.sort(collator);  // ["åtta", "äpple", "zebra"] (Swedish order)
Collation Strength:
collator.setStrength(Collator.PRIMARY);  // Ignore case/accents
collator.setStrength(Collator.IDENTICAL); // Match exactly (default)
Best Practices
- Always Specify Locale: Avoid relying on the JVM’s default.
// Bad:
String.format("%.2f", 1.5);
// Good:
String.format(Locale.FRENCH, "%.2f", 1.5); // "1,50" - Use UTF-8 for Resource Bundles: Prevent garbled text in non-Latin languages.
- Test Right-to-Left (RTL) Languages: Arabic/Hebrew may break UI layouts.
Common Mistakes
❌ Hardcoding Strings:
// Bad:
System.out.println("Total: " + price);
// Good:
String msg = bundle.getString("label.total") + ": " + price;
❌ Assuming Default Sorting:
List<String> list = Arrays.asList("a", "Z", "ä");
list.sort(String.CASE_INSENSITIVE_ORDER);  // Wrong for German!
Example of Internationalization in Java
Problem
Let’s say, we have a software that is currently used by the customers who know the English language. Later our software is going to use by non-native English users from France or Germany. So, in this case, these users from France and Germany may not feel comfortable using it.
Solution
Now, we have the following solutions to fix this problem:
- To develop separate software for these new customer groups or
- A single software that can understand customer’s locality or region and displays the language based on the that
Though, we have to use Internationalization service from Java to implement both the options, the first option is not feasible. Because the number of user locality increases the number of new software required.
The second option is the only best solution to the problem.
Since, Java has very good support for Internationalization because it supports Unicode representation.
Now, let’s create a project and implement internationalization in Java.
Step 1: Setting Up the Project
First, let’s create a new Java project in your favorite IDE. Make sure you have the latest version of the JDK installed.
Step 2: Creating Resource Bundles
Resource bundles are key-value pairs that contain the localized strings for different languages. In our example, we will create two resource bundles: one for English and one for French.
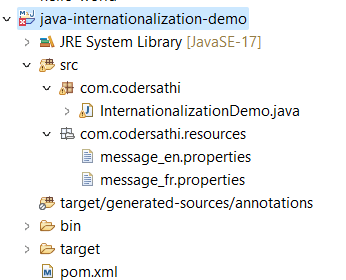
Create a new package in your project called com.codersathi.resources. Inside this package, create two properties files: messages_en.properties and messages_fr.properties.
The messages_en.properties file should contain the following key-value pairs:
greeting=Hello!
farewell=Goodbye!
The messages_fr.properties file should contain the following key-value pairs:
greeting=Bonjour!
farewell=Au revoir!
Feel free to add more key-value pairs for a more comprehensive example.
I’ve used google translator to translate English to French content. If anything is wrong in translation nevermind. 😀
Step 3: Implementing Internationalization in Java
Now, let’s write the Java code to load and display the localized strings. Create a new class called InternationalizationDemo in your project.

package com.codersathi;

import java.util.Locale;
import java.util.ResourceBundle;

public class InternationalizationDemo {
    public static void main(String[] args) {
        // Set the default locale to English
        Locale.setDefault(new Locale("en"));

        // Load the resource bundle for the current locale
        ResourceBundle bundle = ResourceBundle.getBundle("com.codersathi.resources.messages");

        // Display the localized strings
        System.out.println(bundle.getString("greeting"));
        System.out.println(bundle.getString("farewell"));
    }
}
In the above code, we set the default locale to English using the “Locale.setDefault()” method. This ensures that if a translation for the current locale is not available, the English strings will be used as a fallback.
We then load the resource bundle using the ResourceBundle.getBundle() method, passing the base name of the resource bundle (“com.codersathi.resources.messages”) as the argument. The “getBundle()” method automatically selects the appropriate resource bundle based on the default locale.
Finally, we use the “getString()” method of the resource bundle to retrieve and display the localized strings.
Step 4: Testing the Internationalized Application
Now that we have implemented internationalization in our Java application, let’s test it by changing the default locale.
In the “InternationalizationDemo” class, modify the line that sets the default locale to French:
Locale.setDefault(new Locale("fr"));Save the changes and run the application. You should now see the French translations being displayed:
Bonjour!
Au revoir!
Conclusion
Internationalization is an essential aspect of software development, especially for applications that target a global audience. Java provides powerful tools and libraries to make internationalization easy. In this article, we learned how to implement internationalization in Java. By following these steps, we can ensure that our Java applications are ready to be localized for different languages and regions.
FAQ
How to handle languages like Chinese or Arabic?
Use Locale.CHINESE/Locale.ARABIC and ensure fonts/UI layouts support RTL/vertical text.
How to load a resource bundle from a custom directory?
Implement a ResourceBundle.Control or use tools like ReloadableResourceBundleMessageSource in Spring.