Whether you’re an experienced Java developer or a student who is just trying to learn Java, you may have encountered the ClassNotFoundException: com.mysql.jdbc.Driver not found or ClassNotFoundException: com.mysql.cj.jdbc.Driver not found error while trying to connect to a MySQL database.
This error comes when the MySQL JDBC driver is not included in the classpath. This driver is necessary for your Java application to connect to a MySQL database. Without it, you’ll see the ClassNotFoundException: com.mysql.jdbc.Driver not found or ClassNotFoundException: com.mysql.cj.jdbc.Driver not found error.
Table of Contents
Solution
So, how do you fix this error? The solution is actually quite simple – you just need to include the MySQL JDBC driver in your classpath. There are a few different ways you can do this:
- Either, download MySQL JDBC driver from the official website and include it manually in your project.
- Or, use a dependency management tool like Maven to handle the dependency for you. This is the recommended approach as it makes it easier to manage dependencies and updates.
Set classpath on Windows OS
To set up MySQL JDBC Driver in the windows operating system. Please follow the steps given below:
- Find the MySQL JDBC driver file You’ve downloaded using the first method (usually named
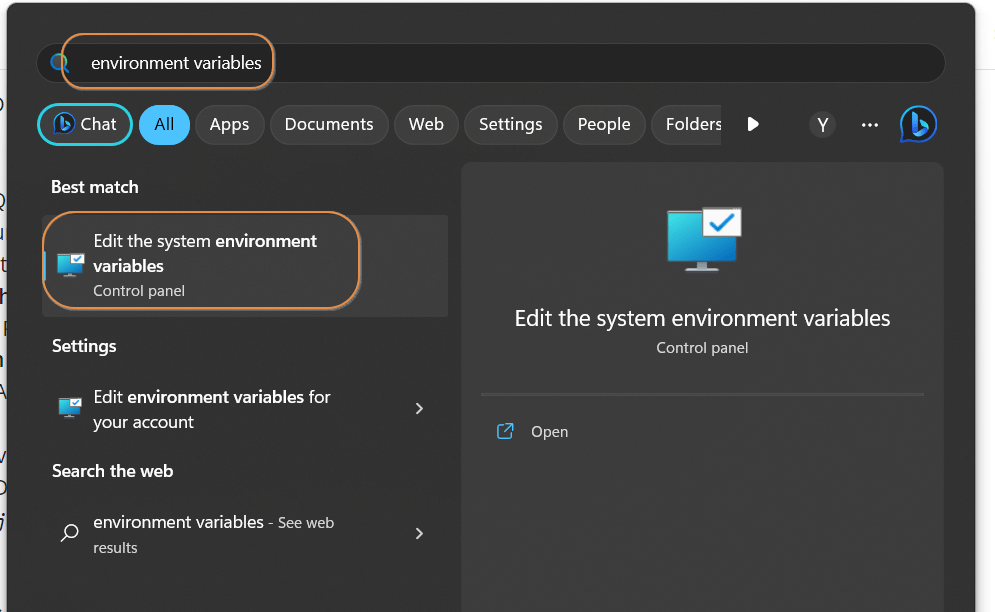
mysql-connector-java-x.x.xx.jarwherex.x.xxis the version number) and make note of the file path. - Go to the Start menu and search for Environment Variables.
- Click on Edit the system environment variables.
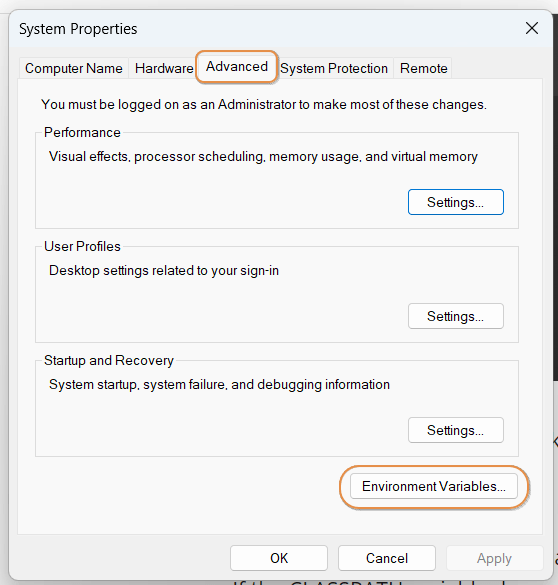
- In the System Properties window, click on the Environment Variables button.
- Under System Variables, scroll down and find the CLASSPATH variable, then click on Edit
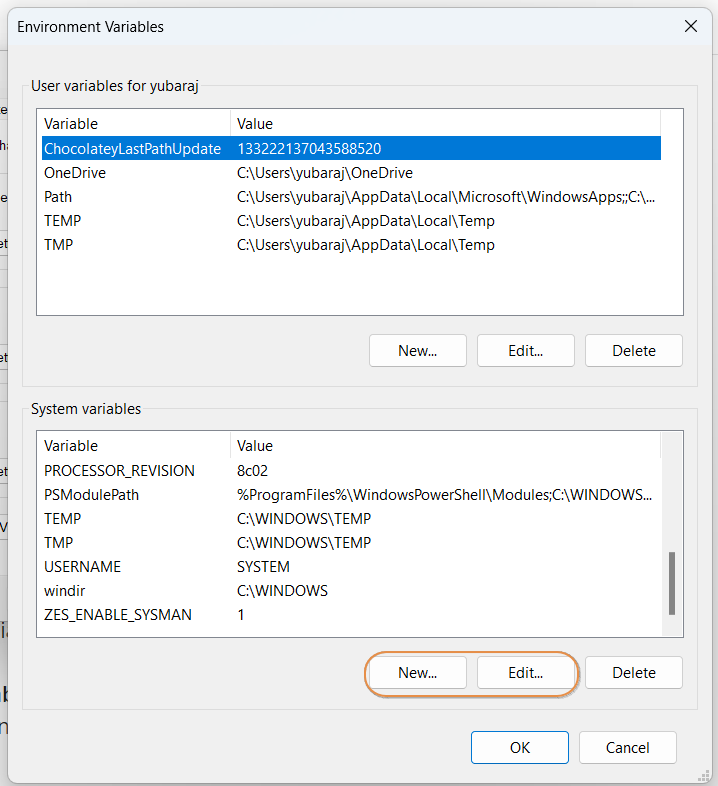
- If the CLASSPATH variable does not exist then create a new one by clicking the New button.

Important things to remember
While adding the values in the classpath make sure to add a dot and semicolon before the actual value and also add at the end with a semicolon. In our case the variable value will be like:.;C:\mysql\mysql-connector-java-8.0.22.jar;
- Click OK on all open windows to save the changes.
- Restart the command prompt or any open applications that need to use the MySQL JDBC driver for the changes to take effect.
- Verify that the classpath has been set correctly by running the command “echo %classpath%” in the command prompt. You should see the path to the MySQL JDBC driver included in the output.
Set classpath on Linux and Mac OS
For Linux and Mac OS, the process of setting the classpath for the MySQL JDBC driver is similar to the process in Windows, but the commands may vary slightly.
Temporary classpath setup
Here are the steps:
- Find the MySQL JDBC driver file (usually named
mysql-connector-java-x.x.xx.jarwhere x.x.xx is the version number) and make note of the file path. - Open a terminal window and navigate to the location where you want to set the classpath.
- Set the classpath using the following command: “export CLASSPATH=$CLASSPATH:path_to_mysql_jdbc_driver” (without quotes) For example:
export CLASSPATH=$CLASSPATH:/usr/local/mysql/mysql-connector-java-8.0.22.jar - Verify that the classpath has been set correctly by running the command
echo $CLASSPATHin the terminal. You should see the path to the MySQL JDBC driver included in the output. - Restart the terminal or any open applications that need to use the MySQL JDBC driver for the changes to take effect.
It’s also important to note that in Linux and Mac OS, you may need to set the classpath in the shell startup file (e.g. .bashrc or .bash_profile) to make it permanent.
Permanent classpath setup
To set the classpath in the shell startup file, you can add the classpath setting command to the appropriate file, depending on the shell you’re using.
- Open a terminal window and navigate to your home directory.
- Open the .bashrc or .bash_profile file using a vim editor, for example:
vim .bashrc- Add the following line at the end of the file:
export CLASSPATH=$CLASSPATH:/path/to/mysql-connector-java-x.x.xx.jarMake sure to replace “/path/to/mysql-connector-java-x.x.xx.jar” with the actual path to the MySQL JDBC driver on your system.
- Save the file and close the text editor using the following command:
Press ese key then type the following command and press enter key.
:wq!The above command writes the changes into the file and quits the editor.
- Reload the shell startup file by running the following command in the terminal:
source .bashrc- Verify that the classpath has been set correctly by running the command “echo $CLASSPATH” in the terminal. You should see the path to the MySQL JDBC driver included in the output.
The classpath setting will now be permanent, and the JDBC driver will be available every time you open a new terminal window or log in to your system.
It’s also important to note that, in some Linux distributions, you may use different startup file such as .bash_profile, .bash_login, or .profile. You can check which file is loaded by running the command ls -al ~/.*sh which will list the files in your home directory that have the .sh extension.
Once you’ve included the MySQL JDBC driver in your classpath, you should be able to connect to your MySQL database without any issues. If you’re not familiar with how to do this, don’t worry – there is an easier way.
Set classpath on Eclipse IDE
You can also add the JDBC driver to your project’s classpath, if you are using an IDE like Eclipse.
There are a few ways to add the MySQL Connector JAR to an Eclipse Java project, here’s one of the most common ways:
- Download the MySQL Connector JAR from the official website.
- In Eclipse, open the project where you want to add the JAR.
- Right-click on the project in the Project Explorer and select Build Path -> Add External Archives...
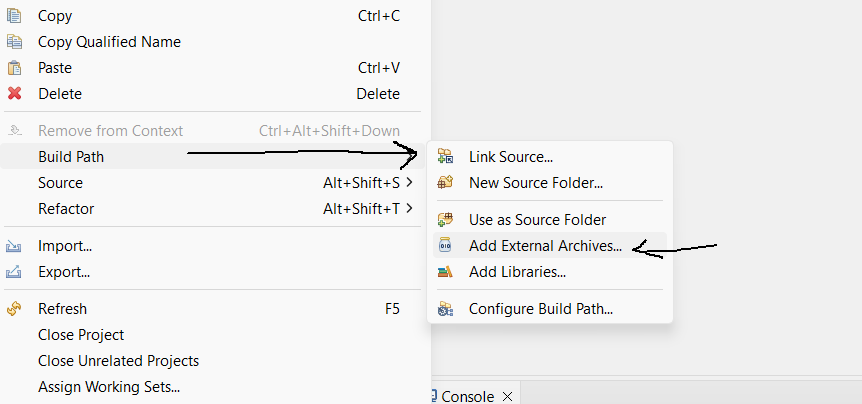
- Navigate to the location where you have downloaded the MySQL Connector JAR and select it.
- Click on the Apply and Close button to add the JAR to the project’s classpath.
Alternatively, you can add the jar file to the build path of your project by following these steps:
- Right-click on the project in the Project Explorer and select Properties.
- Select Java Build Path on the left side.
- Select the Libraries tab, Classpath, and then click on the Add External JARs button.
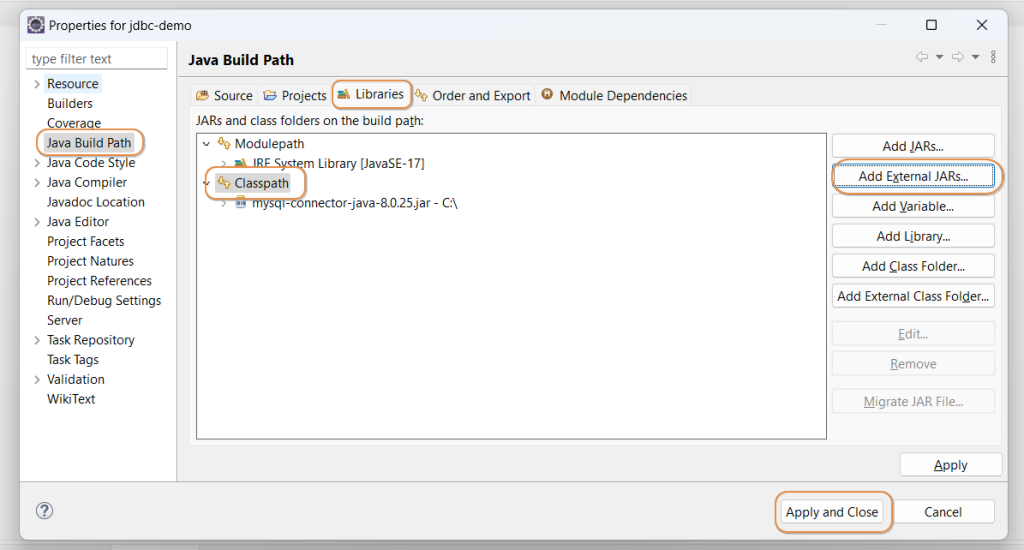
- Navigate to the location where you have downloaded the MySQL Connector JAR and select it.
- Click on the Apply and Close button to add the JAR to the project’s classpath.
You should now be able to use the MySQL Connector classes in your project. You can verify that the jar is added to the build path by checking whether it’s listed in the Referenced Libraries folder in the project explorer.
Note: You may also use the maven dependencies instead of adding the jar file. You can use a dependency management tool like Maven to handle the dependency for you. With Maven, all you have to do is include the following dependency in your pom.xml file:
<!-- https://mvnrepository.com/artifact/mysql/mysql-connector-java -->
<dependency>
    <groupId>mysql</groupId>
    <artifactId>mysql-connector-java</artifactId>
    <version>8.0.22</version>
</dependency>
And then run mvn install command to download and add the dependency to the project.
Conclusion
With either method, you should now be able to connect to your MySQL database without encountering the ClassNotFoundException: com.mysql.jdbc.Driver not found or ClassNotFoundException: com.mysql.cj.jdbc.Driver not found error. Don’t let this pesky issue hold you back from your coding goals – now that you know how to fix it, you can move on to bigger and better things.
Happy coding! 🙂