In today’s interconnected world, email has become an indispensable communication tool. As a Java developer, knowing how to send emails programmatically can be a valuable skill. In this blog post, we will explore the process of sending emails using Java, step by step. By the end, you will have a solid understanding of how to leverage the JavaMail API to send emails effortlessly.
Set Up JavaMail
To begin, you need to set up the JavaMail and Activation library in your project. You can download it from the official Oracle website or include it as a dependency using popular build tools like Maven or Gradle.
If you don’t know how to add an external Jar to your Eclipse project then you can read How to add an external Jar in Eclipse.
If you are already using Maven for your project then make sure to add the following dependency;
<dependency>
	<groupId>jakarta.activation</groupId>
	<artifactId>jakarta.activation-api</artifactId>
	<version>2.0.1</version>
</dependency>
<dependency>
	<groupId>com.sun.mail</groupId>
	<artifactId>jakarta.mail</artifactId>
	<version>2.0.1</version>
</dependency>
Note
If you are using older version of JDK then you have to usejavax.mailandjavax.activationinstead of jakarta.
Import Required Classes
Next, import the necessary classes from the JavaMail API into your Java class. Some of them are listed below:
Properties,Session,Message, andTransport
These imports enable you to access the essential functionality for sending emails.
The easiest way to import these classes is like this:
import java.util.Properties;
import javax.mail.*;
import javax.mail.internet.*;
Configure SMTP Server and Email Properties
Before sending emails, you must configure the SMTP (Simple Mail Transfer Protocol) server and email properties. For instance, when using Gmail, you can set the SMTP server to “smtp.gmail.com” and the port to 587.
final String smtpServer = "smtp.gmail.com";
final int smtpPort = 587;

Properties props = new Properties();
props.put("mail.smtp.auth", "true");
props.put("mail.smtp.starttls.enable", "true");
props.put("mail.smtp.host", smtpServer);
props.put("mail.smtp.port", smtpPort);
Additionally, you need to specify properties such as authentication and TLS (Transport Layer Security) settings.
Authenticate Sender’s Credentials
To send emails via an SMTP server, you must authenticate the sender’s email credentials. This ensures that only authorized users can send emails on behalf of a specific email account. Utilize the Authenticator class provided by the JavaMail API, and override the getPasswordAuthentication method with the sender’s email and password.
Example:
Authenticator authenticator = new Authenticator() {
    protected PasswordAuthentication getPasswordAuthentication() {
        return new PasswordAuthentication("[email protected]", "sender-email-password");
    }
};
Replace "[email protected]" with the actual sender’s email address and "sender-email-password" with the corresponding password.
Create a Session with the SMTP Server
Establish a session with the SMTP server using the Session.getInstance() method. Provide the previously configured properties and the authenticator object to establish a secure connection. This session will be used to send the email.
Example:
Session session = Session.getInstance(props, authenticator);
Compose the Email Message
Create a MimeMessage object, a subclass of the Message class, to compose your email. Set the sender, recipient(s), subject, and content of the email using the appropriate methods. You can include HTML content, attachments, and more, depending on your requirements.
Example:
Message message = new MimeMessage(session);
message.setFrom(new InternetAddress("[email protected]"));
message.setRecipients(Message.RecipientType.TO, InternetAddress.parse("[email protected]"));
message.setSubject("Hello from JavaMail");
message.setText("This is a test email sent from Java.");
Adjust the sender’s and recipient’s email addresses, subject, and content as needed.
Send the Email
Finally, use the Transport.send() method to send the email. Pass the created MimeMessage object as a parameter to this method.
Transport.send(message);
If everything is set up correctly, the email will be sent through the configured SMTP server using the provided sender’s credentials.
Complete Example Code
You can easily copy and paste this code and start testing.
Make sure to change the sender and receiver emails accordingly. 🙂
import java.util.Properties;

import jakarta.mail.Authenticator;
import jakarta.mail.Message;
import jakarta.mail.MessagingException;
import jakarta.mail.PasswordAuthentication;
import jakarta.mail.Session;
import jakarta.mail.Transport;
import jakarta.mail.internet.InternetAddress;
import jakarta.mail.internet.MimeMessage;

public class EmailSender {
	public static void main(String[] args) {
		 // Sender's email credentials
        final String senderEmail = "[email protected]";
        final String senderPassword = "sender-email-password";

        // Recipient's email address
        final String recipientEmail = "[email protected]";

        // SMTP server configuration
        final String smtpServer = "smtp.gmail.com";
        final int smtpPort = 587;

        // Enable TLS (Transport Layer Security)
        Properties props = new Properties();
        props.put("mail.smtp.auth", "true");
        props.put("mail.smtp.starttls.enable", "true");
        props.put("mail.smtp.host", smtpServer);
        props.put("mail.smtp.port", smtpPort);

        // Authenticate the sender's credentials
        Authenticator authenticator = new Authenticator() {
            protected PasswordAuthentication getPasswordAuthentication() {
                return new PasswordAuthentication(senderEmail, senderPassword);
            }
        };

        // Create a session with the SMTP server
        Session session = Session.getInstance(props, authenticator);

        try {
            // Create the email message
            Message message = new MimeMessage(session);
            message.setFrom(new InternetAddress(senderEmail));
            message.setRecipients(Message.RecipientType.TO, InternetAddress.parse(recipientEmail));
            message.setSubject("Hello from Java Email Sender");
            message.setText("This is a test email sent from Java.");

            // Send the email
            Transport.send(message);

            System.out.println("Email sent successfully!");
        } catch (MessagingException e) {
            e.printStackTrace();
        }
	}
}
AuthenticationFailedException Solution
When you run the above program you may see an error like below:
jakarta.mail.AuthenticationFailedException: 535-5.7.8 Username and Password not accepted. Learn more at
535 5.7.8  https://support.google.com/mail/?p=BadCredentials ja11-20020a170902efcb00b001a9bcedd598sm6962318plb.11 - gsmtp
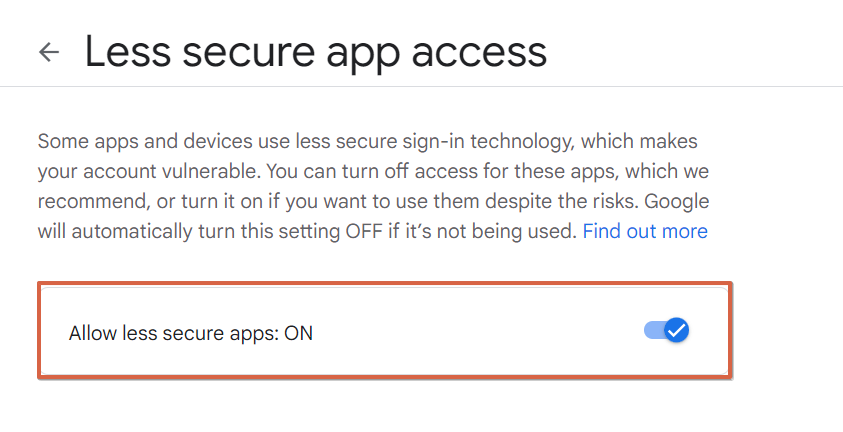
This is because you haven’t turned on less secure app access in your sender email account.
Go to the My Account Security page of your sender email account and turn on Less secure app access.
The default will look like the image below:

You need to enable it by clicking the highlighted area and enabling like:

After enabling it you may see like:

This basically means you can now send emails using Java Mail API using your Gmail account without getting any errors.
Conclusion
In this blog post, we have explored the process of sending emails using Java. By following the step-by-step guide above, you can successfully send emails programmatically using the JavaMail API.
Cheers!
If you have any confusion feel free to comment 🙂
