CoderSathi
  • Tutorial
    • Java Tutorial
    • Swing Tutorial
    • JDBC Tutorial
    • Java String Tutorial
    • Servlet and JSP Tutorial
  • Mongo DB
  • AWS
  • DevOps
  • Linux
  • Git
Home > How to > How to Fix “Files Showing as Modified” in IntelliJ IDEA on macOS

How to Fix “Files Showing as Modified” in IntelliJ IDEA on macOS

Learn the concepts, implementation details, and practical steps with a clean developer-focused walkthrough.

Yuba Raj Kalathoki
By Yuba Raj Kalathoki
Published: May 11, 2026 ยท 2 min read ยท 0 Comments
Share: in X

Have you ever opened a Maven project in IntelliJ IDEA on your Mac only to find every single file marked as “Modified” or “New,” even though you haven’t touched a line of code?

This is a common headache for developers moving between Windows and macOS environments. The culprit isn’t your code. It’s how different operating systems handle the invisible characters at the end of every line.

Table of Contents

  • The Problem: CRLF vs. LF
  • The Quick Fix: core.autocrlf input
    • Step-by-Step Solution
  • Secondary Fix: Registering Directory Mappings
  • Pro-Tip: Use .gitattributes

The Problem: CRLF vs. LF

Windows uses CRLF (Carriage Return + Line Feed) to end lines, while macOS and Linux use LF (Line Feed). When you clone a project created on Windows onto your Mac, Git may detect these line-ending differences as actual file changes. This results in IntelliJ showing blue (modified) or green (new) status for files that should be clean.

The Quick Fix: core.autocrlf input

The most effective way to resolve this globally on your Mac is to tell Git to normalize these line endings automatically.

Step-by-Step Solution

  1. Open your Terminal.
  2. Run the following command:
git config --global core.autocrlf input

This tells Git to convert CRLF to LF when you commit code, but to keep things as-is when you check them out on your Mac.

  1. Refresh IntelliJ IDEA.

Once the config is set, your file status colors should return to normal. If they don’t immediately change, try running git status in your terminal to force a refresh.

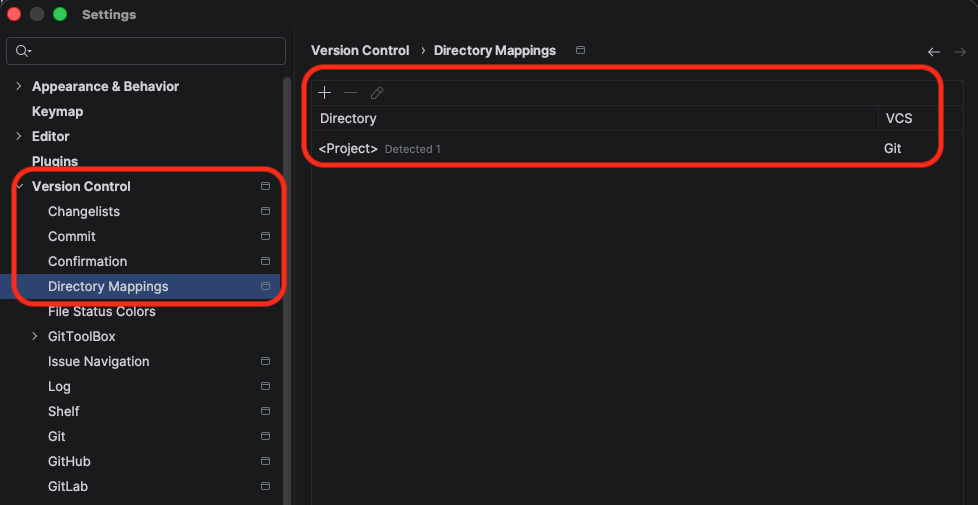
Secondary Fix: Registering Directory Mappings

If the files still show “not in git” or “unregistered,” you may need to tell IntelliJ where your Git root is.

  1. Go to Settings (โŒ˜ + ,) > Version Control > Directory Mappings.
  2. If you see an “Unregistered root” at the bottom, click the + icon to add it.
  3. Ensure the VCS column is set to Git.
Screenshot 2026 05 11 at 17.02.36 1

Pro-Tip: Use .gitattributes

To prevent this issue for everyone on your team (regardless of their OS), add a .gitattributes file to your project root with the following line:

* text=auto

This ensures Git handles line endings consistently across all developer machines.

Related Posts:

  • How to Fix SSH Agent Forwarding on macOS: The…
  • Complete Guide to JaCoCo: How to Measure Java Code…
  • Install and Set Up Java Development Environment
  • Control Statements in Java
  • How to Create Executable JAR File (3 Methods Explained)
  • java.lang.ClassNotFoundException: com.mysql.jdbc.Driver
Tags:gitintellij-ideamac
Was this article helpful?
โ† Previous ArticleHow to Fix NoClassDefFoundError: javax/xml/bind/DatatypeConverter in Java (Java 11+)
Next Article โ†’How to Create a Google App Password: Full Step-by-Step Guide

Recent Posts

  • How to Use AWS CloudFront Signed URLs in Spring Boot?
  • How to Fix SSH Agent Forwarding on macOS: The Ultimate Guide for Developers
  • How to Read AWS Secrets Manager in Spring Boot (Step-by-Step)
  • How to Fix “Public Key Retrieval is not allowed” MySQL JDBC Error
  • Complete Guide to JaCoCo: How to Measure Java Code Coverage Accurately
CoderSathi

Your go-to resource for Java, Spring Boot, Microservices, AWS, and modern development tutorials.

Linkedin

Quick Links

  • About
  • Contact

Popular Topics

  • Java
  • Spring Boot
  • AWS
  • DevOps
  • MongoDB
  • Linux
  • Git
  • How to
ยฉ 2026 CoderSathi. All rights reserved. Privacy Policy ยท Sitemap