

Overview
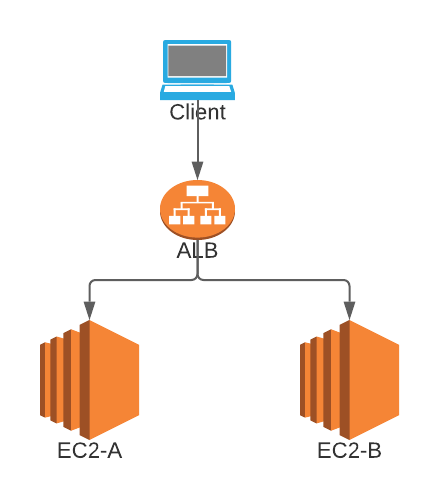
In this post, we will learn to route traffic from AWS Application Load Balancer to EC2 instance in different VPC.
Load Balancing is a technique to automatically distributes incoming traffic across multiple targets. In AWS, such as EC2 instances, containers, and IP addresses, in one or more Availability Zones. It monitors the health of its registered targets, and routes traffic only to the healthy targets. Elastic Load Balancing scales our load balancer as per our incoming traffic changes over time. It can automatically scale to the vast majority of workloads.
Prerequisite
- Two VPCs are already created along with each Route Table
- Application Load Balancer is already created in one VPC
- At least one EC2 Instance is running for each VPC
Solution
This post’s scope is not to create resources like VPC, LoadBalancer, EC2, and so on.
Hence, let’s assume we have the following resources:
- We are using the us-west-2 region
- We have two VPC A and B.
- VPC A has IPV4 CIDR range 10.1.0.0/16
- VPC B has IPV4 CIDR range 172.16.0.0/16
- VPC A has Route Table rtb1
- VPC B has Route Table rtb2
- We have an EC2 instance EC2-A with private IP: 10.1.123.456 running in VPC A and EC2-B with private IP: 172.16.45.67 running in VPC B
- We have an ELB in VPC A. Let’s say ALB-A
Please understand the above resources carefully so that you can easily follow the following step.
Now, let’s start our journey 🙂 to route traffic to instances running in different VPC.
We have mainly 4 steps. These are:
- Peering connection between VPC
- Updating Route Table of each VPC to communicate with each other.
- Creating Target Group and Registering instances into the Target Group
- Adding the Listener in Application Load Balancer to forward a request to the Target Group.
Let’s dive into the steps one by one.
1. Peering Connection between VPC
By default, AWS is disabling communication between different VPCs even in the same account. So, first, we need to connect different VPCs using the Peering Connection service.
Let’s do it.
- Go to VPC service.
- Go to the Peering Connection. You can find it under the Virtual Private Cloud menu.
- Click on Create Peering Connection button.
- Peering connection name tag. vpca-to-vpcb
- VPC (Requester)*: Select VPC A
- Since we are trying to enable VPC Peering between the VPCs in the same account. we don’t have to do anything on Select another VPC to peer with section. Though, you can make sure
- Account: My Account
- Region: This Region
- VPC (Accepter)*: Select VPC B
- Click on Click Peering Connection button.
- Now, the VPC Peering is created successfully. But, you may see the status is pending. We are trying to do VPC Peering in the same account. So, select the newly created peering from the list and go to Actions and click Accept Request. (If you are trying Peering Connection VPCs of another account then you have to login to that account and accept the request.)
2. Updating Route Table of each VPC to communicate with each other.
- Go to Route Tables section and select the route table from VPC A.
- Select Routes tab
- Click on Edit Routes
- Click on Add Route
- Destination: Enter the IPV4 CIDR range of VPC B. In our example, the CIDR range for VPC B is 172.16.0.0/16. So, Enter it.
- On the Target: Select Peering Connection and Choose name of the Peering Connection vpca-to-vpcb which was created earlier.
- Click Save Routes
- Now, we also have to update the route table from VPC B.
- Follow the same steps we used to update the Route table from VPC A. Except the CIDR value. While updating the route table from VPC B we have to define the destination IPV4 range of the VPC A. In our example, the CIDR range for VPC A is: 10.1.0.0/16
In this step, we have successfully updated the Route tables.
3. Creating Target Group and Registering instances into the Target Group
- Select EC2 from services.
- Go to Target Group section which is under Load Balancing menu.
- Click on Create target group
- Under Basic Configuration, choose a target type to IP Addresses
- Target group name: vpca-vpcb-tg (You can give any name :))
- Define the correct Protocol and port.
- VPC: Select the one where the Application Load Balancer is created In our example we have created it in VPC A. So, let’s select VPC A.
- Leave everything default and click Next button.
- Under Register targets,
- Network: Select Other private IP address
- IP: Select the IP from the running EC2 instances. In our case, EC2-A has IP: 10.1.123.456
- Ports: Let’s assume, an application is running in port 8080. So set the value 8080
- Click on Include as pending below
- Similarly, you can register the target for instance EC2-B
- Click Create target group button.
In this step, we have created a Target Group and registered two instances from different VPC using target type as IP Addresses.
4. Adding the Listener in Application Load Balancer to forward a request to the Target Group.
In this step, we will add listener rule to forward request from load balancer to the newly created target group.
- Click on Load Balancers menu.
- Select ALB-A, from where we are going to route traffic to newly created target group.
- Click on Listeners tab.
- Click on Add listener
- Select the protocol and port as per your need.
- Click on Add action and select Forward to…
- Select the target group vpca-vpcb-tg which was created earlier.
- Click on Add listener button which is in top right.
- Done.
We finished all the steps to route traffic to instances running in different VPCs.
Now, you can test whether the you have done correctly it or not. 🙂
Go to your load balancer, copy the DNS name and verify your request.
Conclusion
In this post, we learn to enable PC Peering.
And also, routing traffic from Application Load Balancer to instances running in different VPCs.